
How to convert Word Document to Modern Page in SharePoint online using Power Automate
Prerequisite
To complete these steps, you need
- An X-key. Sign in or register at https://account.xbridger.com to get an X-key. You will need the key to create a connection to Xbridger connector in Power Automate.
- Azure subscription. You need an Automation Account in Azure to create a Runbook
- Before we start, lets’ create a page template. In your modern team site select New then click Page. We are going to be creating a modern page based on this temaplate.
- Select Blank then click Create page. Enter a name for the page and select Save as template from the dropdown near Save as draft
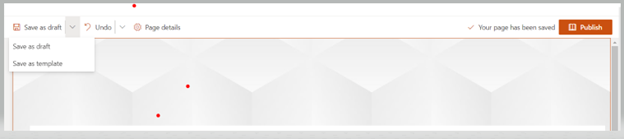
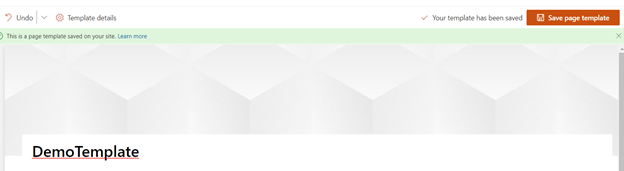
- Give a name to the template, say DemoTemplate and click Save page as template in the upper right corner.
4. Now let’s head to Power Automate. Add Manually trigger a flow action as the trigger
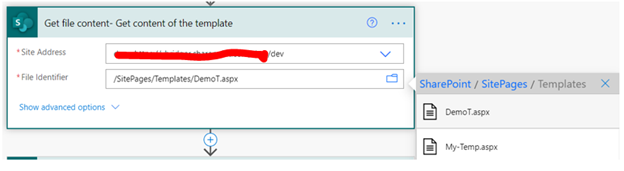
5. Click New step and add Get file content. Set the Site Address field and in the file Identifier, select the template you created in step 3. You can find the template by clicking on the folder icon then select SitePages >Temaples
6. Now we want to create an empty modern page using the template. Add Create file action from SharePoint Connector, and set it up like image below

Enter a name for the page as shown in the File Name. This page will be populated with content from the word document you want to convert. In the File Content, select File Content in the Dynamic content for Get file content action.
7. Add Send an Http request to SharePoint action. Configure it as shown below
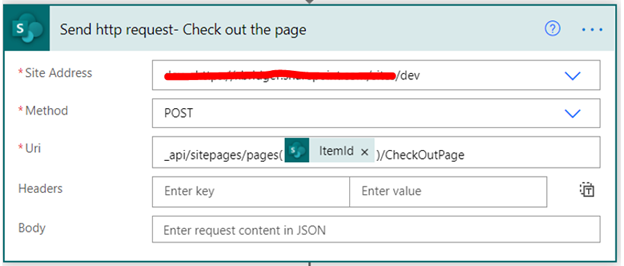
This action is checking out the page so we can write into the page. The ItemId is the Id of the file we created using Create file action.
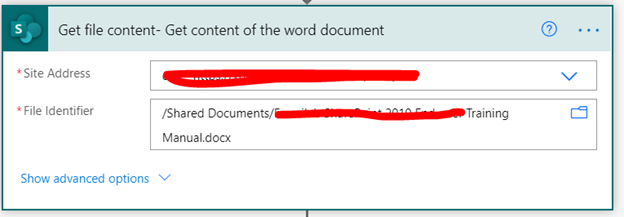
8. Now let us get the content of the Word document we want to write into the page. Add another Get file content action. Select the word document you want to convert.
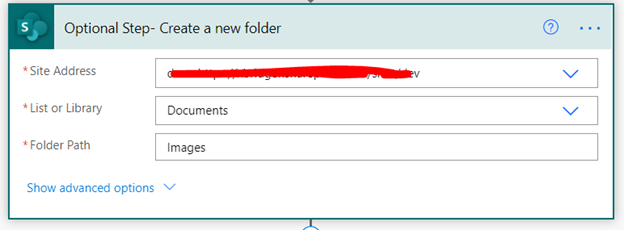
9. If the word document contains images, we need a folder or a library to store those images. The Word document I’m using has a lot of images so I’m going to be creating a folder. So let us add Create new folder action. Select the library where you want the folder created and give the folder a name, say Images.
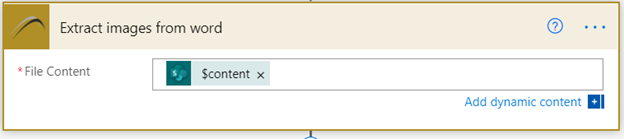
10. Add Xbridger Extract images from word to extract images from the Word document. Use this expression to extract content from the Get file content in step 8, body(‘Get_file_content2’)?[‘$content’]
11. Add Apply to each and add Create file action in the Apply to each and set it up as shown below.
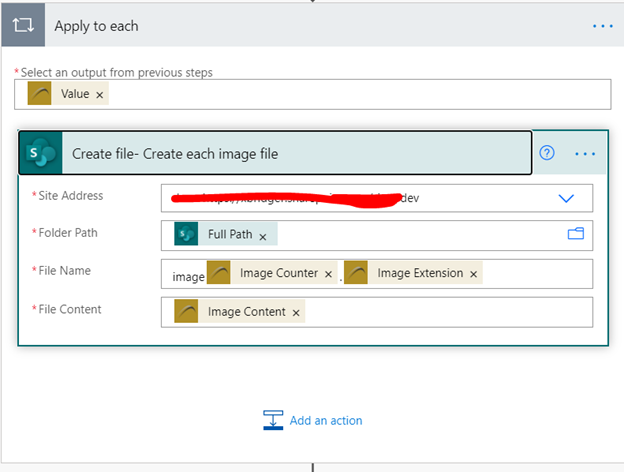
Set the Site Address. In the Folder Path select Full Path in the Dynamic content of the Create new folder action in step 9. In the File Name, set the name as shown. Notice the dot (.). This will create images with name image1, image2 etc.
12. Add Xbridger Convert Word to modern page. Use the expression body(‘Get_file_content2’)?[‘$content’] in the File Content. Note this sets the File Content to the content of the Word document in step 9.
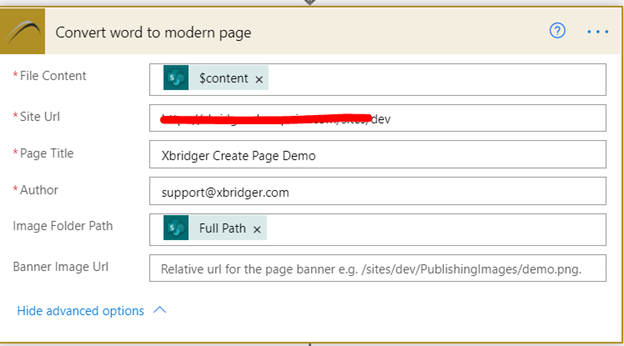
Set the Page Tile, Author. Expand Show advanced options to set the Image Folder Path and Banner Image Url. Image Folder Path is the path to the image folder we created in the previous step. Set Banner Image Url if you want to change the banner image for the page or leave empty to use default.
13. Add another Send an Http request to SharePoint action and configure it as shown below

This step preps the page with the JSON object required to set the page’s properties. The last step will update the page with the returned HTML string representation of the word document.
14. To continue we need to create Runbook to run the script that will set the page’s text. Create a PowerShell Runbook in Azure portal and the following script
param
(
[Parameter (Mandatory = $true)]
[string] $InstanceId,
[Parameter (Mandatory = $true)]
[string] $PageName,
[Parameter (Mandatory = $true)]
[string] $Text,
[Parameter (Mandatory = $true)]
[string] $SiteUrl
)
$User = “support@xbridger.com”;
$cred = Get-AutomationPSCredential -Name $User
Connect-PnPOnline -Url $SiteUrl -Credentials $cred
Set-PnPClientSideText -Page $PageName -InstanceId $InstanceId -Text $Text
Set-PnPClientSidePage -Identity $PageName -CommentsEnabled:$false -Publish
Disconnect-PnPOnline
Replace User variable with an account that has permission to create pages and set your credential appropriately.
Note You will need to add SharePointPnPPowerShellOnline module to the Modules gallery if you have not done so already.
15. Add Create job action from Azure Automation. Configure it as shown below. Note you need an Azure subscription to be able to use the Runbook

If everything looks good, save your changes and test.
16. Go to the Site Pages on the site where you are creating the page. You should see your page with content from the word document. Note the page will only be populated when the job completes.
Note: You may need to enable scripting on your site if you receive error while creating the page
If you need any help do not hesitate to contact us via support@xbridger.com.